Transitioning from Ladybug5 to Ladybug5+
Preparing for use
Before you use your camera, we recommend that you are aware of the following resources available from our downloads page:
- Getting Started Manual for the camera—provides information on installing components and software needed to run the camera.
- Technical Reference for the camera—provides information on the camera’s specifications, features and operations, as well as imaging and acquisition controls.
- Firmware updates—ensure you are using the most up-to-date firmware for the camera to take advantage of improvements and fixes.
- Tech Insights—Subscribe to our monthly email updates containing information on new knowledge base articles, new firmware and software releases, and Product Change Notices (PCN).
Questions about Upgrading from Ladybug5 to Ladybug5+
Is Ladybug5 being discontinued?
Yes, but not immediately. The Ladybug5+ is intended to replace the Ladybug5.
What other hardware is needed to use Ladybug5+?
Ladybug5+ uses the same hardware as Ladybug5.
- Interface Card—The Ladybug5+ requires a USB 3.1 PCIe host controller card compliant with the SuperSpeed USB Specification and the xHCI Specification. A host controller card is available as an accessory. For VR-360 applications, we recommend the latest on-board Intel host controller and driver to handle the high data rates associated with operating the camera at 30 FPS.
- Cable—The Ladybug5+ requires a USB 3.1 Type-A to Micro-B cable with locking screws. A 5 m cable is provided with the camera.
- Power supply—Power must be provided through the 12-pin GPIO interface. The required input voltage is 12-24 V. A power supply and wiring harness is provided with the camera.
- Mounting—Both a desktop and a tripod mount are provided with the camera.
Can I run Ladybug5+ with my existing application?
The Ladybug SDK version 1.15 (or newer) is required to run Ladybug5+. This version of the SDK contains the following new features and enhancements:
- Added ladybugSetGpsTimeSync() call to API
- Added ladybugGetGpsTimeSync() call to API
Additionally, the Ladybug SDK contains several new example programs to support new the features of Ladybug5+, including:
- ladybugGPSTimeSync
Using an earlier version of the Ladybug SDK with Ladybug5+ is not supported.
Image Processing Pipeline
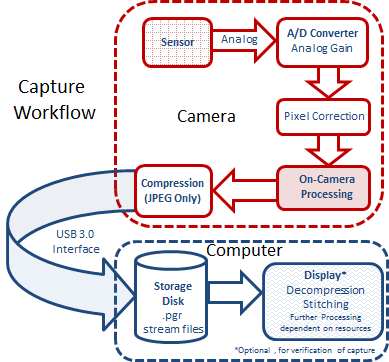
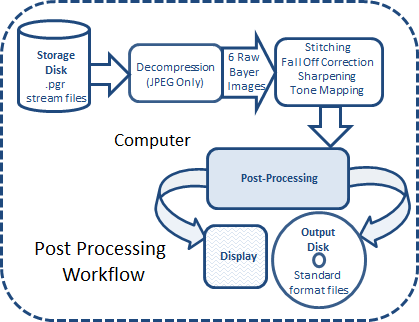
Image Processing
For both Ladybug5 and Ladybug5+, when using Raw8 or JPEG8 pixel formats, some image processing is done on the camera during capture before being output to the PC. Additional post processing is then performed on the PC.
When using Raw12, RAW16, or JPEG12 pixel formats, most of the image processing is done on the PC. This processing is done as part of ladybugConvertImage(). This allows users to fine tune the output settings independently from image capture.
User access to adjusting the parameters for image processing is available in LadybugCapPro or via CSRs.
| Description | Ladybug5/Ladybug5+ | |
|---|---|---|
| 8-bit Pixel Formats | On Camera Processing | Gain Black level Pixel correction White balance Gamma |
| Post Processing on PC | Stitching Fall off correction Sharpening Tone mapping |
|
| 12- or 16-bit Pixel Formats | On Camera Processing | Pixel correction |
| Post Processing on PC | Stitching Falloff correction Sharpening Tone mapping Bayer decoding Gain Black level White balance Gamma EV compensation |
Data Format
| Description | Ladybug5 | Ladybug5+ |
|---|---|---|
|
Image Data Formats |
Raw8, Raw12, Raw16, JPEG8, JPEG12 |
|
|
Video Data Output |
8-, 12-, or 16-bit Raw or JPEG compressed |
|
|
Resolution Full |
2448 x 2048 |
2464 x 2048 |
|
Resolution Half |
2448 x 1024 |
2464 x 1024 |
Formats, Frame Rates, Image Sizes
| Ladybug5 | Ladybug5+ | |||||||
|---|---|---|---|---|---|---|---|---|
| Frame Rate | Image Size | Frame Rate | Image Size | |||||
| Pixel Format | Full 2448 x 2048 | Half 2448 x 1024 | Full 2448 x 2048 | Half 2448 x 1024 | Full 2464 x 2048 | Half 2464 x 1024 | Full 2464 x 2048 | Half 2464 x 1024 |
| Raw8 | 8 | 16 | 30 MB | 15 MB | 13 | 26 | 30 MB | 15 MB |
| JPEG8 Compressed | 10 | 16 | Variable | Variable | 30 | 60 | Variable (13 MB maximum) |
Variable (6 MB maximum) |
| Raw12 | 5 | 10.5 | 45 MB | 22.5 MB | 8 | 16 | 45 MB | 22.5 MB |
| JPEG12 Compressed | 10 | 16 | Variable | Variable | 30 | 60 | Variable (13 MB maximum) |
Variable 6 MB maximum) |
| Raw16 | 4 | 8 | 60 MB | 30 MB | 6 | 12 | 60 MB | 30 MB |
Values are calculated with a theoretical maximum of 400 MB/s on the USB3 host controller. The Ladybug5+ has automatic buffer JPEG usage enabled to adjust the JPEG quality to fit. The maximum variable values are the worst case scenarios.
Shutter Range
Both Ladybug5 and Ladybug5+ offer four preset shutter range modes to set the maximum shutter value:
- Drive Highway—maximum shutter is set to as short as possible to prevent motion blur. Best used outdoors at high speeds or images may be too dark. This is the default.
- Drive City—maximum shutter is slightly longer than highway mode, suitable for slower speeds (~45 km/hour or 25 mph).
- Indoor—maximum shutter is slightly longer than the drive modes, for use in indoor applications.
- Low Noise—maximum shutter is not restricted.
Auto Exposure Modes
Both Ladybug5 and Ladybug5+ offer three preset modes for the auto exposure algorithm:
- Bottom 50%—uses only the bottom 50% of the five side cameras and excludes the top camera from its calculations.
- Top 50%—uses only top 50% of the five side cameras and includes the top camera in its calculations. This is the upside down version of the first mode, used when the camera is mounted upside down (for example, on a helicopter).
- Full Image—uses the entire image of all six cameras for its calculations. This is the default.
For 8-bit pixel formats, the auto exposure modes are set for image capture. For 12- and 16-bit pixel formats, the auto exposure modes are set both for image capture and post processing on the PC.
Software Workflow
Image Acquisition
The Ladybug5+ can be started and controlled in the same way as Ladybug5. However, there are some changes to your source code that should be made.
- Auto buffer usage should be enabled in JPEG data formats, instead of using a fixed JPEG quality value. This allows the camera to adjust the JPEG compression quality in order to fit the image into the available buffer size. The camera clamps the maximum quality value used to 80%. You can control the feature using ladybugSetAutoJPEGQualityControlFlag(), and control the buffer usage using ladybugSetAutoJPEGBufferUsage(). A buffer usage value between 90% to 95% is suggested.
- The default SDK settings when starting the camera are designed to allocate the appropriate frame buffer sizes in order to support 30 FPS or 60 FPS acquisition via an Intel host controller. If the desired frame rate or bandwidth is lower, the default SDK settings may be inadequate. Please see Using Packet and Buffer Size to Adjust Frame Rate on Ladybug5+ for further information on how to optimally tune your settings.
Stream Recording
The Ladybug5+ has the same maximum bandwidth and the amount of data written to disk per second is the same as Ladybug5. It is possible to greatly reduce the amount of data sent in JPEG modes by reducing the compression quality.
Image Processing and Stitching
The workflow for data formats with on-camera image processing remains the same. See the LadybugPanoStitch example for an example.
For data formats that do not perform image processing on-camera, see ladybugImageAdjustment.h in the \include directory for image processing parameters as well as usage instructions. In addition, the LadybugCapPro application provides a graphical interface to these parameters.
In both cases, ladybugConvertImage() prepares the image for output purposes, including JPEG decompression, Bayer demosaicing as well as image post processing.
Image Output
The image output functionality remains the same as previous LadybugCapPro versions. If a full resolution panoramic image is desired, it is recommended that an output size of 10000 x 5000 is used.
| Image output formats: | Video output formats: |
|
|
Image Size
For Ladybug5, the size of a single camera image after image conversion is 2448 x 2048. For Ladybug5+, the size of a single camera image after image conversion is 2464 x 2048.
If your software allocates its own memory for image conversion and texture updating, the amount of memory to be allocated should be 6 x W x H x (bytes per channel), where bytes per channel is 1 for 8‑bit modes, 1.5 for 12-bit modes, and 2 for 16-bit modes.
For example, the memory size required to contain a JPEG8 image after conversion is:
Ladybug5: 6 x 2448 x 2048 x 1 = 30081024 bytes
Ladybug5+: 6 x 2464 x 2048 x 1 = 30277632 bytes
Detailed Comparison between the Ladybug5 and Ladybug5+
Mechanical Properties
| Description | Ladybug5 | Ladybug5+ |
|---|---|---|
| Digital Interface | USB 3.1 for camera control and video data, with locking screws for secure connection | |
| General Purpose I/O Ports | 12-pin GPIO connector for external trigger input, strobe output, and power | 12-pin GPIO connector for external trigger input, strobe output, power, and PPS |
| IR Filter | The infrared cut-off filter used has the same transmittance properties | |
| Dimensions | 197 mm x 160 mm | |
| Optics | Six high quality 4.4 mm focal length lenses | |
| Case | Machined aluminum housing, anodized red or black; single unit, water resistant | |
| Mass | ~2.9 kg | 3 kg |
| Mounting | The case is equipped with five M4 X 0.7 mounting holes on the bottom that can be used to attach the camera directly to the desktop mount, tripod adapter, or a custom mount |
|
| Desiccant | Desiccant plug to minimize moisture in the enclosure and prevent lens fogging | |
| Transfer Rates | 5 Gbit/s | |
GPIO Properties
| Diagram | Color | Pin | Function | Ladybug5 Description | Ladybug5+ Description |
|---|---|---|---|---|---|
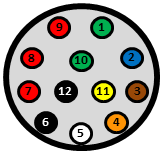 |
Green | 1 | OPTO_GND | Ground for opto-isolated IO pins | |
| Blue | 2 | I0 | Opto-isolated input (default Trigger in) | ||
| Brown | 3 | O1 | Opto-isolated output | ||
| Orange | 4 | IO2 | Input/Output | Input/Output / GPS data | |
| White | 5 | +3.3 V | Power external circuitry up to 150 mA | ||
| Black | 6 | GND | Ground for bi-directional IO, VEXT, +3.3 V pins | ||
| Red | 7 | VEXT | Allows the camera to be powered externally | ||
| Red | 8 | VEXT | Allows the camera to be powered externally | ||
| Red | 9 | VEXT | Allows the camera to be powered externally | ||
| Green | 10 | OPTO_GND | Ground for opto-isolated IO pins | ||
| Yellow | 11 | IO3 | Input/Output | Input/Output / PPS signal | |
| Black | 12 | GND | Ground for bi-directional IO, VEXT, +3.3 V pins | ||
Hardware/Electronics
| Description | Ladybug5 | Ladybug5+ |
|---|---|---|
| Sensors | Sony ICX655 CCD x 6 | Sony IMX264 CMOS x 6 |
| Power Interface | via GPIO only, not via USB3 interface | |
| Power Consumption | 12-24 V, 13 W | |
| A/D Converter | 12-bit | |
| Environmental Sensors | Temperature, Barometer, Humidity, Accelerometer, Compass | Temperature, Humidity |
| LED | One general purpose status LED for monitoring camera power, initialization, and USB 3.1 activity | |
| Operating Temperature | 0° to 45°C | -20° to 50°C |
| Storage Temperature | -30° to 60°C | |
| Relative humidity Operating | 20 to 80% (no condensation) | |
| Relative humidity Storage | 20 to 95% (no condensation) | |
| Field of view | ~90% of full sphere | |
| Spherical Distance | Calibrated from 2 m to infinity | |
| Focus Distance | ~200 cm. Objects have an acceptable sharpness from ~60 cm to infinity | |
Firmware
| Description | Ladybug5 | Ladybug5+ |
|---|---|---|
| Camera Specifications | IIDC v1.32 | |
| High Dynamic Range | Cycle 4 gain and exposure presets | |
| External Trigger Modes | Trigger Modes 0, 1, 3, 14, 15 | |
| Gain | 0 dB to 18 dB | |
| Gamma | 0.50 to 4.00 | |
| Shutter Speed | 0.02 ms to 2 seconds (extended shutter mode) |
|
| Shutter Type | Global Shutter | |
| Memory Channels | 2 memory channels for custom camera settings | |
| Flash Memory | 1 MB | |
Software, Driver, and System Support
| Description | Ladybug5 | Ladybug5+ |
|---|---|---|
| Driver Options | FLIR PGRxHCI driver | FLIR PGRUSBCam driver |
| Bandwidth Management | USB 3.1 does not automatically manage bandwidth allocation. For more information on setting up multiple USB 3.1 cameras, see our knowledge base. |
|
| Camera Enumeration | Enumeration on the Universal Serial Bus is supported natively by the OS | |
| Ladybug SDK versions | 1.7 Release X+ | 1.15 Release X+ |
| Recommended Operating Systems | Windows 7 64-bit Ubuntu 12.04 64-bit, for capture and recording only |
Windows 10, 64‑bit Ubuntu 16.04 64-bit, for capture and recording only |
| Software Requirements for Ladybug SDK | Microsoft Visual Studio 2005 | Microsoft Visual Studio 2010, or newer g++ 5.4.0, or newer |
| CPU (recommended) | 3 GHz Dual/Quad Core | Intel Core i7 processor |
| RAM (recommended) | 8 GB | |
Dimensions
Note: The Ladybug5+ case has a dowel pin locator to ensure consistent orientation when mounting.
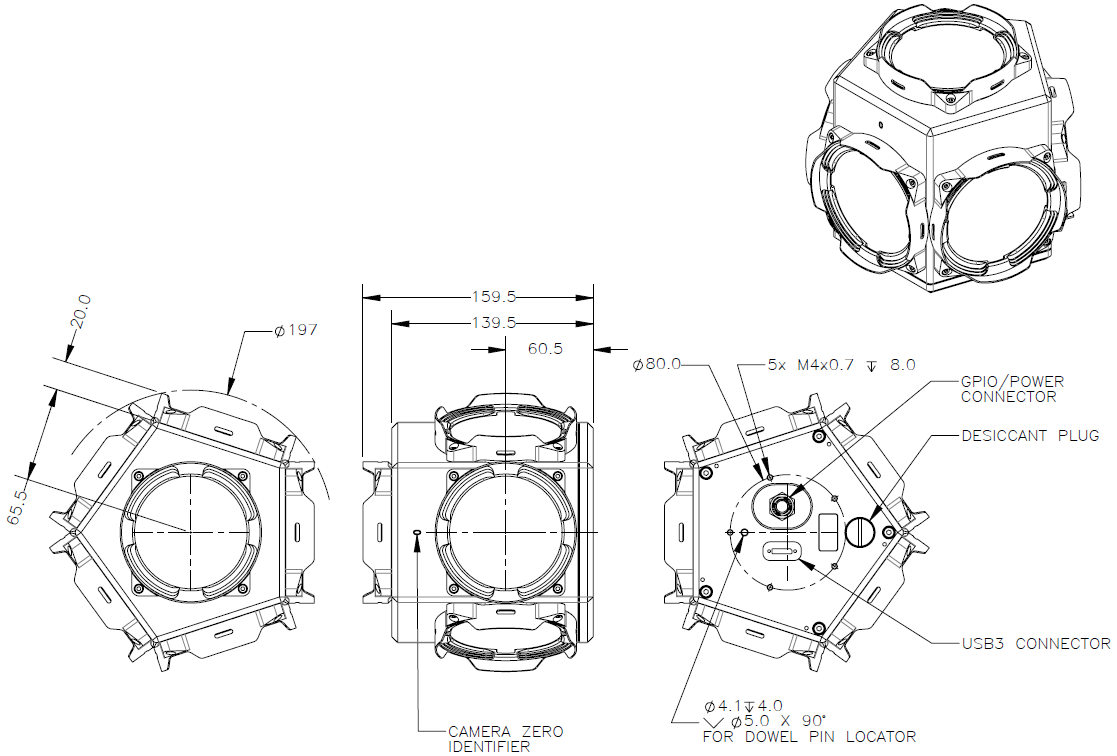
Ladybug5 and Ladybug5+ Dimensional Diagram
Related Articles
-
 Application Story
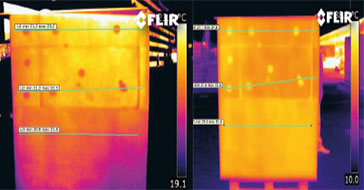
FLIR cameras support analysis and diagnosis of external thermal insulation systems
Read the Story -
 Case Study
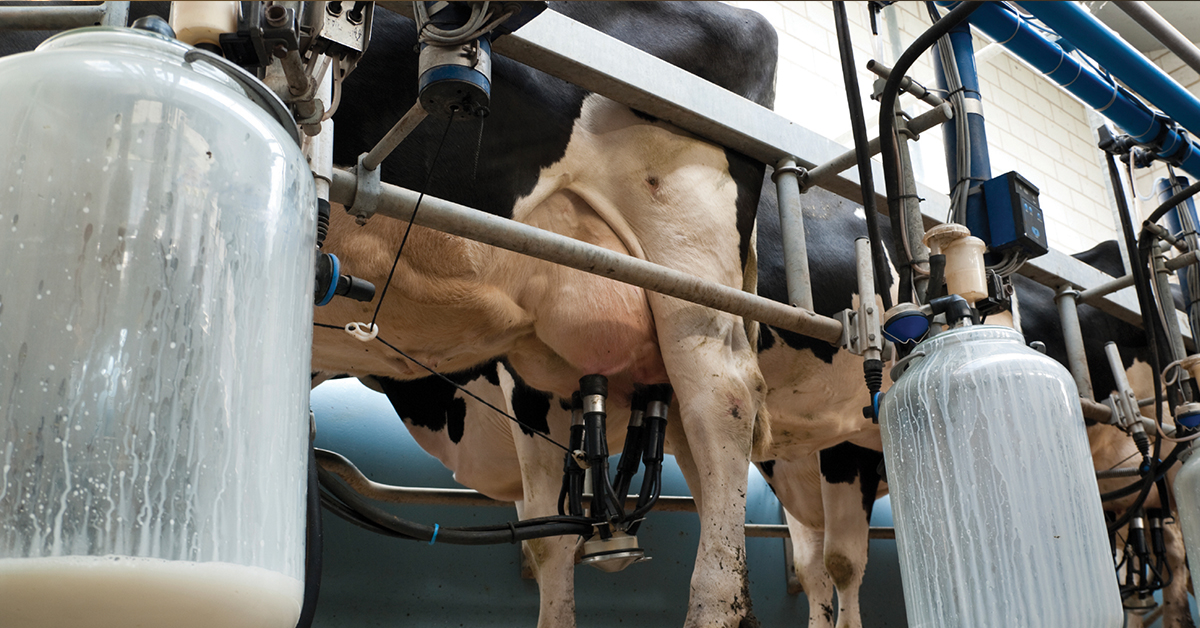
Automatic Health Check in Dairy Farms Using FLIR Thermal Imaging Cameras
Read the Story -
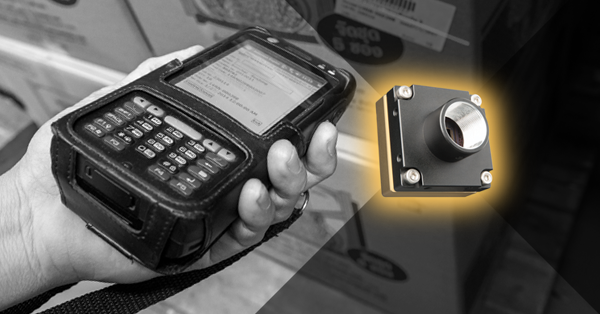 Deep Learning
Comparing Deep Learning Cameras with Smart Cameras
Read the Story